Tuesday, November 6, 2012


New Happenings

There are a lot of great things brewing here around the paint bench so I thought that I’d take a breather for a moment and outline a few of those new things on the horizon for the fall and winter.

After bouncing around a bit this summer trying to locate the right spot to hold classes, I have made the decision to resume my airbrush classes at BearAir in Easton. The first one will be the introduction to Airbrushing Class in January with another to follow in April. I am very excited to get these classes rolling again! Classes can be purchased directly at www.BearAir.com or shortly at www.stevenleahy.com.
Next bit of news is the addition of a store to my website. This has been planned for a while and it is fantastic to know it is in the final stages. From the online store, you will be able to sign up for classes, purchase artwork (both reproductions and originals) and even possibly airbrushes through Richpen. Look for the brand new store very soon!

Third event that has started brewing is the next solo art exhibit. The process now is at the stage where I am drawing up a proposal for the show and beginning to look for a venue. The show itself will feature the miniature artwork from the past year. One of things that I have found is that for as great as the online reaction to these paintings has been, it is nothing like the experience of seeing them for real. Everything from the beauty of the custom built frames to the actual artwork, it is the impact of the total package that makes the experience. The rough date for the opening will likely be in May of 2013 so stay tuned.

Finally, the workbench has been buzzing lately with commissions. That is always good for keeping the lights on. The latest has been the razor blade painting for NASCAR driver #96 Ben Kennedy. The challenge here was to pull off the sponsor logos in a way that would look real. Once this painting is clear, I have two more commissions to get done before I start digging into some of the new paintings for the show in May. My artistic passion is really fueled there as I can take chances on my own pieces that I cannot take on someone else’s. Keep an eye on my facebook page https://www.facebook.com/StevenLeahyArt for daily updates on those and all other studio projects.

Thanks as always for checking in and seeing what is new!!

Saturday, January 14, 2012

To Air is Human

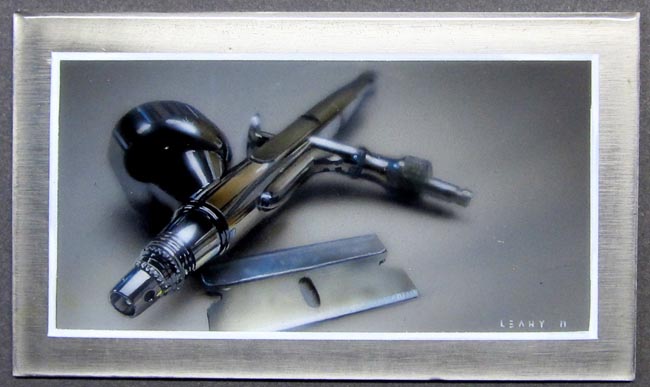
Air and Steel 1.75"x3" Wicked Colors on titanium 2011
To Air is Human

Over the next few blogs, I hope to answer some of the questions about the tools and materials that have found their way onto my bench as the standard. Hopefully the information from my trial and error will help you shorten your learning curve. This week the focus will be on the heart of the operation, the airbrush. 

It was 1988 and I was a sophomore in college learning to be an illustrator. At the time we were surrounded by the incredible commercial art of artist’s like Eddie Young and Michael Cacy and the stunning work of Sorayama. Seeing all of this amazing art and knowing that one of the common threads in all of it was the airbrush sealed my decision to get one of my own.


1988 Iwata HP-SB

My search however, began with absolutely no idea of what I was doing or what I really needed to get started. Fortunately my father knew of someone that worked in his company that did know about airbrushes. I remember telling him that was that I really didn’t care how much it cost, I just wanted the best I could get. Of course I was secretly hoping that his answer wasn’t going to shatter my fragile Ramen Noodle/ Suzy-Q college based budget. The airbrush that he recommended I get was the Iwata HP-SB side feed airbrush. He listened to what I was hoping to get out of the airbrush and he knew that the fine detail, slow feeding SB would do the job. He was right. For the next twelve years that brush served me flawlessly. As fast as I could learn a new technique, that airbrush had the refinement and quality to keep up.

In the early part of the 2000’s some changes in my personal life found me looking for the stability of a full time job. I couldn’t have been luckier to have BearAir right in my back yard. After a long interview (it was more like an airbrush discussion between old friends) I was hired. Suddenly it was like a kid let loose in a candy store. I now had access to every major airbrush brand on the market. If there was a brush to beat my venerable SB, it would be here. Some of the staff recommended the gravity fed HP-C from Iwata but I found the larger .3mm needle and nozzle did not seem to atomize the paint with the same control and refinement that the .2mm SB did.

Richpen 213c Plus
All during this time, there was a brand of airbrush that hung in the background. Richpen. They were a Japanese airbrush and like Olympos, lacked the distribution of some of the other brands so they weren’t as well known in the U.S. One model in particular kept finding its way into my hands. The model was the Phoenix 213c. This .3mm gravity feed seemed to defy the stereotype of the other .3mm gravity feeds. This brush was able to atomize the paint at the same level as my .2mm side feed yet had the faster feed of a gravity feed and the larger paint reservoir. In addition, because it had a .3mm tip, it was able to work with a thicker viscosity paint. It was the best of both worlds. In the beginning I was using it to cover larger areas of my work that needed a controlled application of color. Slowly however, I found myself using the 213c for more and more in my work. I was able to get some staggeringly fine lines out of it even with the thicker acrylic paints I was using.

I did find some discomfort however in the beehive shaped trigger of the airbrush. The original solution was to grind it down however Steve Angers at BearAir found a more comfortable trigger for the brush which thankfully eliminated the extra work of modification. One other very helpful upgrade to the design of the 213 came in the introduction of the cutaway handle. Cleanouts were made much easier now that the needle chuck can be accessed instantly. This new model was designated the Richpen 213c plus and still to this day the only airbrush to unseat my trusty Iwata.

The important thing to take away from all of this is that the airbrush that ultimately ends up in your hand must be an extension of you. It needs to perform the job that you intend it to do with the least amount of compromise. Search out high quality and reassure your goal by knowing that the expense will be worth it.

Next blog, I’ll be looking at the similar evolution of the paint that I have been using. Please post any questions, comments or thoughts, I'd love to hear them! Thanks for checking in!

Tuesday, January 3, 2012

Funny how things evolve

'Eight-One'
Wicked Colors on dogtag


When I began this blog, it was meant to be the place that I would break down and share the progress of the new paintings. What was quickly found was that the power and reach of facebook easily covered the ability to show the updates from the studio on a daily basis. I was left with the need for a place that I could get more in depth with the steps and processes that are involved in getting the paintings done. This blog has evolved to fill that need. Here will be the place to share some of the things that I have learned about the different techniques and tools. In addition, because of the blog's format, it can also be a great place to answer questions and get feedback about the current projects.

So please, bookmark this page, share it and check back often. Most of all, let me know what you think. Your input will help drive the direction of this blog!

Monday, November 22, 2010

So much going on!


The holidays are descending fast and furious. Way too much to do and already not enough time. Well, things are just that way here as well. The drive of the majority of my work is aimed towards the solo show in January. It is my goal to show as many people as I possibly can what I am doing and where I see my artwork going. As a result, production and promotion have all been in high gear. Press releases heading out all last week, painting and framing. All this while still weaving in the smaller paying jobs that keep things going. Good news is that there has been a positive response for the show so far. A couple of magazines have expressed interest and hopefully that will turn into more.

One other great feeling from this past week is to see our Model Monday Events really starting to take shape and become what we had hoped it would be. The goal was simple. Find people who would be willing to sit for a free portrait and then invite other artists to come and join us with their paints and pencils. It has turned out to be a lively, artistic event that has brought together old friends and created new friends. It has quite simply grown into what both Erin and I had hoped it would. We are looking forward to many more Monday night Model nights at the SAART Gallery. Please come on down and join us from 6-8pm.

On the bench in the studio is a brand new razor painting however with this one I am breaking down the complete project as I go. With any luck, I will get this how-to published for everyone to see. If all works out, it will coincide with the opening of the show and that would simply be over the top. Thanks for checking in and I’ll talk to you all next week!!

Tuesday, November 2, 2010

Tools of the Trade

Coast Guard Dog Tag paining in progress

Righpen 213c

It’s pretty interesting how the style of painting and the materials that we choose to paint with really ends up governing how our studio runs. This recent string of miniature paintings and the effect that it had on my workspace is a great example of that. First, thanks to the generosity of the folks at Createx Colors, I have had the opportunity to use their Wicked Paint line in my monthly Intro to Airbrush classes and then throughout my studio. The paint is an ultra-high performance, multi-surface airbrush paint that comes in two pigment grinds. One line for more opaque coverage and one for more detailed airbrushing. The spray characteristics of both lines have proven to work well through my Richpen 213 airbrush.


Watercolor and Liner brushes
In these recent small paintings, I have been incorporating more and more traditional brush work. What I have found was that for my style of painting, my liner and watercolor brushes have worked the best. These colors are intended to be used through an airbrush so the dry time on the paint is lightning fast. Dry times like this are not always conducive with paint brush work. To counter this, I have used the Wicked Reducer mixed with a Retarder that is from the Createx Colors line. This has slowed the dry time enough to pull the lines and details I need from the paint.


One of the things that I have enjoyed about this paint is that once it is dry, it cannot be reactivated unlike Gouache, Watercolors or Urethanes. This makes it possible to add washes of color with a paint brush and not affect the layers below. This is important when it comes to blurring airbrush and paint brush strokes together for a more seamless painting.

The airbrush that is used with these paintings was also determined by the paint. Out of the bottle, these paints are vibrant and fairly heavy viscosity. Even with the reducer, they tend to hold a thickness that allows the slightly larger .3mm nozzle of the 213 to excel. Atomization of color through this brush allows me more control than my smaller .2mm airbrushes.

Frankenstein's Lab

My workspace itself has also transformed with all these micro paintings. Proper lighting has always been the goal however now it has become paramount. Low light makes painting these kinds of details impossible. As a result, I have built two rails for my drafting table that can be slid in and out. The clip on goose neck lamps can now be positioned anywhere on the surface of the drafting table. These prototypes were made out of scrap wood yet they have proven to work well so now I will make them out of better wood and even add small storage spaces on them for commonly used tools.

Finally the framing of these small paintings have again determined a change in my workspace. Because of the paintings unique size and shape, I ended up working with my father to design a custom frame for them. My brother in law is fantastic with woodworking and made the first four prototypes which worked out perfectly. With the plans for the show in January and 10 new paintings looming, I made the decision to start collecting the tools to make the frames here as well to take the burden off him a little.
With all these adjustments in place, things have started to move together smoothly. Given that there are still several small paintings that need to be started and finished before the show in January…..smooth it just what I need right now!

Thanks for checking in this week!!

Thursday, October 28, 2010

The Big Show

"Oakhill Eagles" - 2010 - Waterborne on board - 4"x4"


Well, it has been interesting being sidelined by such a potent cold. However, the really nice thing about working in the same place that you live are the opportunities to get a few things done here and there despite something like a cold slowing you down. This week has been an exercise in painting in the windows of feeling ok.

"Semper Fidelis" - 2010 - Waterborne on Steel - 1.13"x2"
My sister Katie is involved with an auction/fundraiser in November and I was able to finish up the painting that I planned on donating to the event. While the cold kept me from being productive enough to finish the two paintings that were on the bench for this week, at least this one got done being on the tighter timeline of the two. The other painting on the bench was the fourth painting in the dog tag series of paintings. These dog tag paintings have really taken on a life of their own which is great to see. The series of five paintings will be the feature paintings at my first solo show planned for January 16th.

"Army Strong" - 2010 - Waterborne on Steel - 1.13"x2"
My work currently hangs at the SAART gallery in Stoughton, Massachusetts which is a co-op gallery made up of the work of twelve talented artists. As a co-op gallery we all share the responsibilities of running the gallery. This involves everything from running the gallery during operating hours to creating and organizing events. Members like Erin Crowley have set up open figure drawing nights, other members have organized charity events like Elaine Ostrander’s open house to benefit the Massachusetts State Police K-9 program.

In one of our recent member meetings we had begun to talk about putting together shows to feature our artists. They were looking for a volunteer to kick it off and I gladly accepted. Having a solo show is really extremely important for an artist. It is that time when all the new work can be brought together and shown at once. While there is always a lot of planning and preparation for a solo show, it is by far worth the experience.

"Strong to Save" - 2010 - Waterborne on Steel - 1.13"x2"
Since I have been producing a lot on very small paintings recently, I decided that the show coming up would be a great opportunity to feature them all. In addition to that, the show would be a great opportunity to raise some money for a good cause. My good friend Ken Taylor had mentioned that he had some blank dog tags at his shop that I could have and they became the perfect substrate for the donation paintings. These five paintings, representing the different branches of the military would raise money for the US Wounded Soldiers Foundation.

So the rush now is to get them all finished by mid November so they can be featured in all of the press releases. Once the press releases are out, I will be able to focus on finishing all the remaining paintings for the show. The goal is to hit twenty new paintings.

For tonight though, I have decided to give in to my pounding headache, stuffed sinuses and achy back and get some rest.

Thanks for checking in and I’ll talk to you next week!

Thursday, October 21, 2010

Ducati Blade - Part 2


Here is the second installment in the painting of the Ducati blade. From here the emphasis shifts from mostly airbrush work to a balance of work with both the airbrush and a paint brush.

In the same photocopy template method as before, I move to a mid gray color to put in all the areas on the motor and rear wheel. I work to keep this color slightly dark in case something isn’t in quite the right spot. This subtle color is easier to adjust.

Now the work starts with the paint brush. In order to keep things steady on such a small scale, I have taken some of the painting techniques that I have learned from my good friend Keith Hanson. Keith is a master pin striper and airbrush artist and over the years, I have watched and learned some great brush techniques from him. One thing that is interesting in how a pin striper works is the way that they brace their hands together to steady the lines. This was the first thing that I found I needed to adopt in order to keep the brush where I wanted it. Second, when a pin stripe is being applied, the bristles of the brush are placed on the surface and not removed until the line is done. I found this part to be a challenge coming from a more painterly, watercolor style. The results of learning this technique however yielded controlled lines no bigger than the width of a hair.


This is what the blade looks like after the edges of the red were cleaned up, the lighter gray and black details were painted in. All the photocopy template work that was done up to this point has really laid in a great road map as to where things go. As you can imagine, if a detail is off by a half a centimeter on this scale, it is off by a mile.

The same paint brush techniques are used again with a very light gray.


When I create a painting, one of my primary goals is to remove the indication of what tools were used in that work. I want the viewer to see the image, not the method. One of the best indications I have of a success here is when the viewer’s reaction is simply ‘How did you do that?’ A large part of that comes from blending different techniques. The goal is to successfully take the strengths of one tool while at the same time diminishing the weaknesses of another. Without a doubt, few tools blend color like an airbrush. That is true on any scale. From this stage in the painting, through the end, I bounce back and forth. Painting in some details with the paint brush and then softening them with the air brush. I have a set of pocket sized templates from artist Scott MacKay that work brilliantly on this scale.


Here is the blade with all the details in and ready for clear. Since this blade is metal and it is primed and painted with automotive grade primers and paint, it will receive a two part catalyzed clear coat. Since this clear is extremely tough, it will allow me to frame this without glass. This point is very important as I have found that the reflections in glass (even the museum, non glare glass) can distract from such a tiny piece.

Finally, the blade is mounted in a custom frame designed and built by both my father and brother in law. This one is officially renamed ‘1098’ for the model of the bike and is ready for the gallery.


The full effort of the studio now is to finish the five donation paintings for the show in January. Since they are such an important part of the show, the press releases that go out in mid-November needs to feature them. Currently, I have two done and should have the third done this week. Here is a quick preview of the Army and Navy tags.


Thanks very much for checking in!